Introduction
ESP-Jumpstart: Build ESP32 Products Fast
Building production-ready firmware can be hard. It involves multiple questions and decisions about the best ways of doing things. It involves building phone applications, and integrating cloud agents to get all the features done. What if there was a ready reference, a known set of best steps, gathered from previous experience of others, that you could jumpstart with?
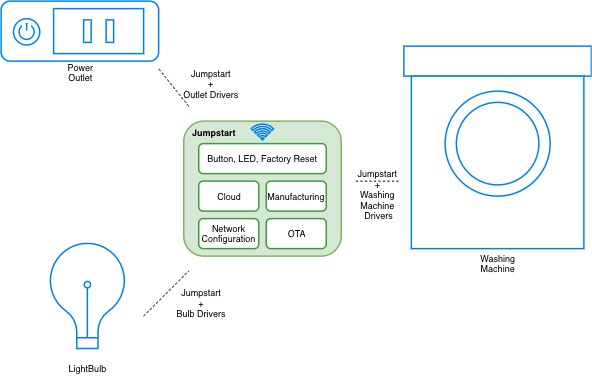
ESP-Jumpstart is focused on building ’products’ on ESP32. It is a quick-way to get started into your product development process. ESP-Jumpstart builds a fully functional, ready to deploy “Smart Power Outlet” in a sequence of incremental tutorial steps. Each step addresses either a user-workflow or a developer workflow. Each step is an application built with ESP-IDF, ESP32’s software development framework.
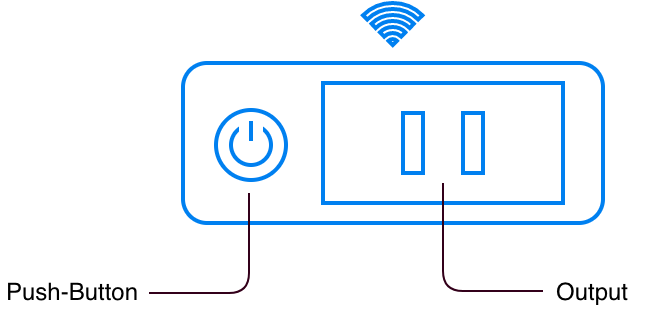
Smart Power Outlet
The ESP-Jumpstart’s Smart Power Outlet firmware assumes the device has one input push-button, and one GPIO output. It implements the following commonly required functionality.
- Allows user’s home Wi-Fi network configuration through phone applications (iOS/Android)
- Ability to switch on or off a single GPIO output
- Use a push-button to physically toggle this output
- Allow remote control of this output through a cloud
- Implements over-the-air (OTA) firmware upgrade
- Performs Reset to Factory settings on long-press of the push-button
Building your production firmware, is a matter of replacing the power-outlet’s device driver, with your device driver (bulb, washing machine).
Jumpstart Applicability
You will require the following to get started:
- An ESP32 development kit: ESP32-DevKit-C (Available on DigiKey, Mouser, Amazon)
- A Development setup (https://docs.espressif.com/projects/esp-idf/en/latest/get-started/)
For the Restless
If you are familiar with Espressif’s hardware and/or embedded systems, and are looking for a production-reference without the incremental steps, you can do the following:
- Directly use the final application in ESP-Jumpstart
- Create the manufacturing configuration file, based on the instructions provided in Section [sec:gen_factory_data] and flash it at appropriate location
- Build, flash and boot up the firmware image as you usually do
- Use the reference phone-app (iOS/Android) libraries for building your phone applications. Or use the reference application to try things out as discussed in Section [sec:unified_prov]
- Configure your AWS IoT Cloud configuration as mentioned in Section [sec:aws_cloud] and use the commands to control and monitor the device remotely
- Integrate with your OTA upgrade service
- And you are good to go!